Monday 30 April 2018

WRONG TRUECALLER NAME, HOW CAN CHANGE NAME ON TRUECALLER

Truecaller Shows Wrong Name?? 

Read this article to know what are the steps that you should follow to fix this bug. TrueCaller is a name that acts as a warrior against spams and unwanted calls. This is a powerful mobile app that lets you know who’s calling before answering the call. This goes well with the tagline, “Truecaller see who is calling”. Earlier people used to see names of saved contact number on their phones but with the help of mobile number tracking apps like Truecaller, one can see contact details of the unsaved numbers too.

Though, benefits of doing mobile number search by name and address with truecaller are many but there are some bugs too. One of the most common bugs is wrong name display on Truecaller. Yes, it does happen and a lot of people have complaint about this. If you too are one of them, do not worry. In this article, you will learn what to do if Truecaller shows wrong name. This is a step by step guide that tells you how to change your name on Truecaller. But before we proceed to solution, let’s learn the root cause of why truecaller shows wrong name when someone dials a number.

WHY SHOWING WRONG NAME ON TRUECALLER ?

Truecaller is fetching data from previous owner of mobile number
Someone has saved your number with wrong name
May be you have got a new sim and downloaded Truecaller to get phone number details with name. To your surprise, Trucaller may display a wrong name if its history still contains the data of previous owner of this mobile number.

The second possible reason of displaying wrong name in Trucaller is that someone has saved your mobile number with incorrect name and Truecaller has fetched this incorrect name from its database. For example, suppose you dance quite well and one of your friends has saved your name with “Cool Dancer”, it may happen that Truecaller will show “Cool Dancer” instead of your original name when someone dials your number. This is because, Truecaller works on a principal of getting data from large database who have installed Truecaller free download and saved contact details as well. So, to Truecaller the database is pointing towards a wrong name and hence it is displaying the incorrect name in Truecaller id.
We heard about such issues a lot and would like to share one with you. One of our readers shared his experience with us and tell us that he is Retired Army Officer but Truecaller is showing Real Estate Agent. How embarrassing is this? This can happen to anyone and we should know how to change wrong name in Truecaller. So, let’s get started.

How to Change Name in Truecaller ID – Method1
Step-1: Install the Truecaller Online Name Search App on your phone

Step-2: Open the App menu and click on Edit Profile Link

Step-3: You will see an Edit Option against your name. Click on it.

Step-4: Now enter the name of your choice. You can enter First Name and Last name to change previously stored name in Truecaller.

Step-5: Click on Save and that’s it.

This is how you can change name in Truecaller. Wasn’t that simple? Let’s check out the second method too.

Changing Name in Truecaller – Method 2

You can change name in Truecaller by making changes to Truecaller name suggestion page. This page is dedicated to serve name suggestions for a particular number from the Truecaller users. You can go to that page and suggest a name for your mobile number. Click on the link given below to jump to Truecaller Name Suggestion Page now.

Truecaller Name Suggestion Page


Now give a few details about your Truecaller ID like your phone number, first name, and last name.Hit submit button in the end and that’s it. Your name suggestion request will go to the Truecaller executives, They will review it before approval.

So. these were the two methods to change wrong name in truecaller. You can use any of the above methods to change your name from truecaller ID.

Hope this works for you. Please share your thoughts with us.

Thanks for reading this article on “What to Do If TrueCaller Shows Wrong Name”.

WRONG TRUECALLER NAME, HOW CAN CHANGE NAME ON TRUECALLER

Truecaller Shows Wrong Name?? 

Read this article to know what are the steps that you should follow to fix this bug. TrueCaller is a name that acts as a warrior against spams and unwanted calls. This is a powerful mobile app that lets you know who’s calling before answering the call. This goes well with the tagline, “Truecaller see who is calling”. Earlier people used to see names of saved contact number on their phones but with the help of mobile number tracking apps like Truecaller, one can see contact details of the unsaved numbers too.

Though, benefits of doing mobile number search by name and address with truecaller are many but there are some bugs too. One of the most common bugs is wrong name display on Truecaller. Yes, it does happen and a lot of people have complaint about this. If you too are one of them, do not worry. In this article, you will learn what to do if Truecaller shows wrong name. This is a step by step guide that tells you how to change your name on Truecaller. But before we proceed to solution, let’s learn the root cause of why truecaller shows wrong name when someone dials a number.

WHY SHOWING WRONG NAME ON TRUECALLER ?

Truecaller is fetching data from previous owner of mobile number
Someone has saved your number with wrong name
May be you have got a new sim and downloaded Truecaller to get phone number details with name. To your surprise, Trucaller may display a wrong name if its history still contains the data of previous owner of this mobile number.

The second possible reason of displaying wrong name in Trucaller is that someone has saved your mobile number with incorrect name and Truecaller has fetched this incorrect name from its database. For example, suppose you dance quite well and one of your friends has saved your name with “Cool Dancer”, it may happen that Truecaller will show “Cool Dancer” instead of your original name when someone dials your number. This is because, Truecaller works on a principal of getting data from large database who have installed Truecaller free download and saved contact details as well. So, to Truecaller the database is pointing towards a wrong name and hence it is displaying the incorrect name in Truecaller id.
We heard about such issues a lot and would like to share one with you. One of our readers shared his experience with us and tell us that he is Retired Army Officer but Truecaller is showing Real Estate Agent. How embarrassing is this? This can happen to anyone and we should know how to change wrong name in Truecaller. So, let’s get started.

How to Change Name in Truecaller ID – Method1
Step-1: Install the Truecaller Online Name Search App on your phone

Step-2: Open the App menu and click on Edit Profile Link

Step-3: You will see an Edit Option against your name. Click on it.

Step-4: Now enter the name of your choice. You can enter First Name and Last name to change previously stored name in Truecaller.

Step-5: Click on Save and that’s it.

This is how you can change name in Truecaller. Wasn’t that simple? Let’s check out the second method too.

Changing Name in Truecaller – Method 2

You can change name in Truecaller by making changes to Truecaller name suggestion page. This page is dedicated to serve name suggestions for a particular number from the Truecaller users. You can go to that page and suggest a name for your mobile number. Click on the link given below to jump to Truecaller Name Suggestion Page now.

Truecaller Name Suggestion Page


Now give a few details about your Truecaller ID like your phone number, first name, and last name.Hit submit button in the end and that’s it. Your name suggestion request will go to the Truecaller executives, They will review it before approval.

So. these were the two methods to change wrong name in truecaller. You can use any of the above methods to change your name from truecaller ID.

Hope this works for you. Please share your thoughts with us.

Thanks for reading this article on “What to Do If TrueCaller Shows Wrong Name”.

Friday 27 April 2018

Best New Gmail Features , We Must Know How its Work

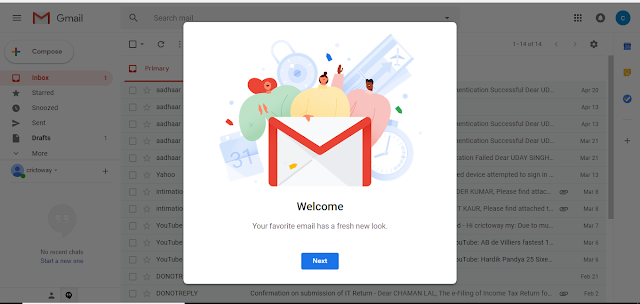
Pretty much everyone has a Gmail account, so it’s a big deal that Google decided to overhaul the interface. The new Gmail redesign has started rolling out, and many users are already able to take advantage of some cool new features.
IN GOOGLE

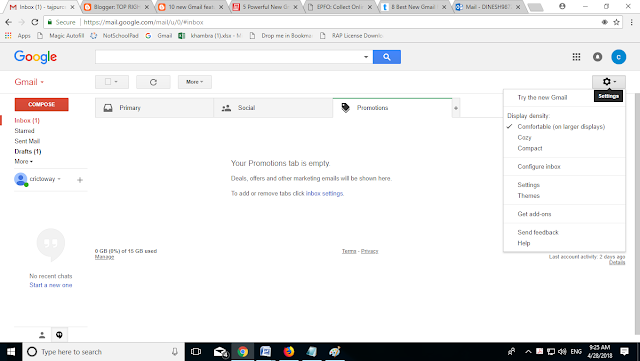
1.Very First Click on Try the new gmail

IN GOOGLE

Inline Action Buttons
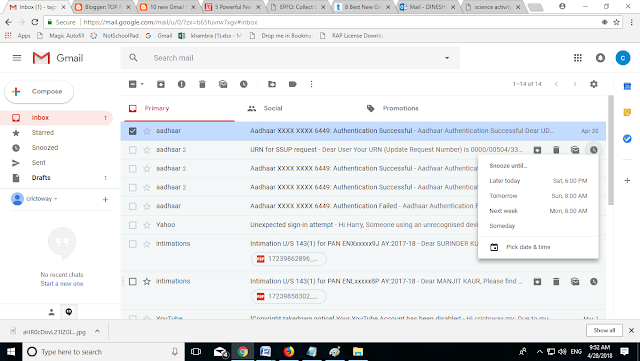
Easily my favorite addition to Gmail are inline action buttons that pop up on a message in your inbox to give you quick access to frequently used actions. From left to right, the four inline icons let you take a message and archive it, delete it, mark it read or unread or snooze it. (More on that item in a moment.)

IN GOOGLE

These buttons improve on Gmail's old way of handling one-off tasks. Before, when I wanted to delete a single message from my inbox, I would have to click on the box to the left of the message, then click again on the delete button. The inline delete button lets me take care of that with a single click. (The old click-the-box-next-to-a-message trick is still the best way to handle multiple emails at once, though.)

Snooze Messages

At least several times a day, usually during working hours, an important message will pop up in Gmail that requires more of a thoughtful response than I can give it at the moment. My options are either to drop what I'm doing and respond or ignore the message and hope I remember to get to it later. Gmail's new Snooze feature is a better approach to that latter problem. 

IN GOOGLE

 Select the Snooze option, and Gmail makes a message go away, only to bring it back to your attention at a later point in time. By default, you can make message vanish until later today, tomorrow, this weekend, next week or the disturbingly vague "Someday." You also have the option of setting a specific time for that snoozed message to return to your attention.

Gmail Will Nudge You

Speaking of resurfacing messages, Gmail will now take matters into its own hands if it feels like there's a message you need to respond to. The new nudge feature notices if you've left an email sitting for a few days without a reply or whether someone hasn't yet respond to one of your queries; if so, an inline message will appear, asking if maybe you want to reply or follow up.

It's unclear just how this feature will work, but I suspect Google's tapping into its machine learning prowess to spot things like dates, deadlines and other calls to action. So far, in my tour of the new Gmail, I've yet to be nudged, and I'm interested to see how often these little reminders pop up. Few things are as annoying in modern life as the dreaded "just following up" email, so I'm hopeful Gmail doesn't overdo it with the nudging.


Clickable Attachments

Action buttons aren't the only thing that have gone inline for Gmail's refresh. Attachments now appear inline, too, so you can open them without having to open a message first. This can be a real-time saver if you've already read the message and just need to get to the attachment quickly. 

IN GOOGLE

 Confidential Mode

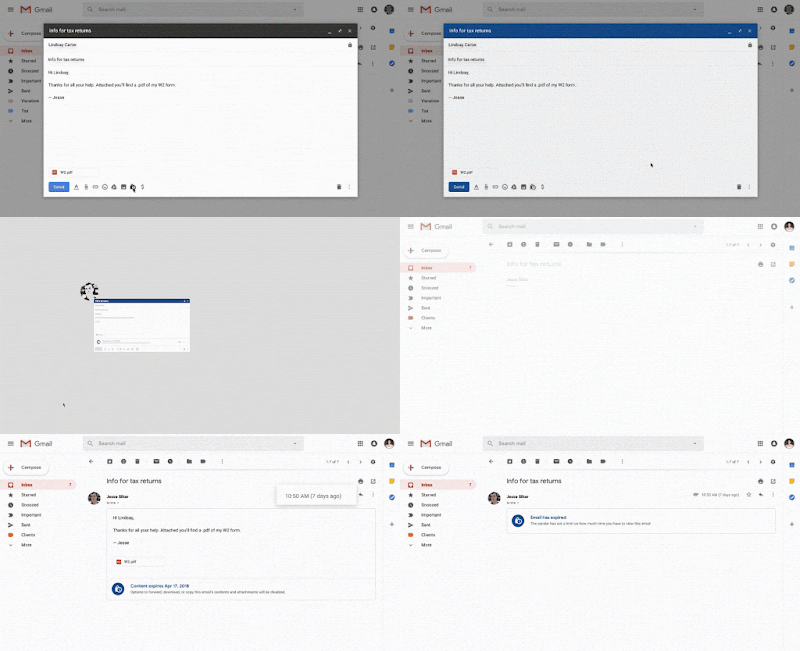
One of the most-talked about features coming to Gmail doesn't appear to be available yet, at least not in the version I've been testing. But when Gmail's Confidential mode does appear, you'll be able to send self-destructing emails to people — or at least, messages that expire at a time of your choosing.

IN. GOOGLE


Smart Reply

If you use the mobile version of Gmail, you're already familiar with the Smart Reply feature that puts tappable canned responses in a message to help you quickly reply. That feature's made its way to Gmail on the desktop, saving you from unnecessary keystrokes when all you need to do is confirm that a meeting time is good for you.

Mobile Changes

Google lavished most of its attention on the desktop version of Gmail. But the Android and iOS versions are getting an update, too. High priority notifications will alert you when important messages come in. Gmail will also start suggesting that you unsubscribe from mailing lists and newsletters you never bother opening — a variation of a feature already built into the Mail app on iOS.


Thursday 26 April 2018

Windows 7, 8, and 10 - Show Hidden Files and Folders


Windows stores many important settings in hidden files and folders. Do not modify or delete hidden files if you do not know precisely what will happen as a result. DoIT assumes no liability for data loss that occurs as a result of this procedure.
Procedure

1.Access the Control Panel.
2.Type "folder" into the search bar and select Show hidden files and folders.

3.Then, click on the View tab at the top of the window.
4.Under Advanced Settings, locate "Hidden files and folders." Select Show hidden files and folders just below that.

5.Click on OK.
6.Hidden files will now be shown when performing searches in Windows Explorer.
Note: Hidden files will be greyed out. This is merely to indicate that they are a hidden file. You can still use them as though they were a normal file.

Wednesday 25 April 2018

Best Windows 7 tips and tricks


Windows 7 is a good operating system right out of the box, but tweaking some of the settings and using keyboard shortcuts can enhance the Windows experience.

Here are Best useful Windows tips and tricks to help you get more out of Windows 7:
1. Bypass the Recycle Bin
The Windows Recycle Bin is a good safeguard against accidental file deletions. However, when you know you want to permanently delete a file, you can bypass it. Instead of pressing the Del key, press Shift+Del, then Shift+Enter to confirm.

If you prefer, you can also permanently disable the Recycle Bin. First, right-click on the Recycle Bin, then choose Properties. Click on the drive you want to disable the Recycle Bin for, then select "Don't move files to the Recycle Bin. Remove files immediately when deleted." Click the OK or Apply button to save the changes.

2. Lock Windows quickly

Whether you're at the office, library, or cafe, it's always a good idea to lock Windows before you step away. To lock Windows quickly, press Windows Logo+L.


3. Show hidden files, folders, and drives
To view files, folders, and drives that Windows hides, open the Windows search box (Windows Logo) and type folder. Next, select Folder Options from the search list and navigate to the View tab. Under Hidden files and folders, check the box next to "Show hidden files, folders, and drives."

4.Rename multiples files
To rename multiple files in Windows, highlight the files you want to rename, then hit the F2 key. Rename the first file, then hit Enter. All your files will be renamed and a number in parenthesis will be added to the end of the name. If you change your mind, you can hit Ctrl+Z to undo the rename.

Windows 7 Keyboard Tricks 

5.[Windows] + [D] (Aero Peek)
Show or hide the desktop.
[Windows] + [Home] (Aero Shake)
Minimize all but selected window. Reverse by clicking the key combination again.
[Windows] + left arrow OR [Windows] + right arrow (Aero Snap)
Dock selected window to the left or right half of your screen.
[Windows] + up arrow OR [Windows] + down arrow (Aero Snap)
Maximized and restores the selected window.
[Windows] + [SHIFT] + up arrow OR [Windows] + [SHIFT] + down arrow (Aero Snap)
Maximizes and restores selected window in vertical dimension only.
[Windows] + [Tab] (Aero Flip)
Launch 3D representation of open windows and click [Tab] key again to flip through them.

6.Windows & Taskbar
1.[Alt] + [Ctrl] + [Tag] + left/right/up/down arrow
     Flip window.
2. [Alt] + [Tab]
     Cycle through open windows.


[Windows] + [T] OR [Windows] + [SHIFT] + [T]
Move focus to front or back of taskbar. Press [T] again while holding the [Windows] key to cycle through items in the taskbar from left to right or, with [SHIFT] button held too, from right to left.
[Windows] + [B]
Puts focus on the ‘show hidden icons’ button on the system tray.
[Windows] + [1] THROUGH [Windows] + [9]
Launch first through ninth icon on taskbar, including items pinned to taskbar.
[Windows] + [SHIFT] + [1] THROUGH [Windows] + [SHIFT] + [9]
Starts new instance of respective taskbar icon.
[Windows] + [Ctrl] + [1] THROUGH [Windows] + [Ctrl] + [9]
Cycles through multiple instances of the respective icon.
[Windows] + [Alt] + [1] THROUGH [Windows] + [Alt] + [9]
Opens jump list for respective icon.


8.Multiple Monitors
[Windows] + [SHIFT] + right arrow OR [Windows] + [SHIFT] + left arrow
Move selected window from one monitor to another. They will remain in the same relative location.
[Windows] + [P]
Select presentation display mode.

9.Magnifier

[Windows] + [+] OR [Windows] + [-]
Activates Windows Magnifier to zoom in or out of screen.
[Ctrl] + [Alt] + [D]
Switch to docked mode.
[Ctrl] + [Alt] + [L]
Switch to lense mode.

  • [Ctrl] + [Alt] + [F]
    Switch from docked or lens mode back to full screen mode.
  • [Ctrl] + [Alt] + [I]
    Invert colors.
  • [Windows] + [Esc]
    Exist magnifier views.

HOW CREATE USER AND PASSWORD IN WINDOW 7


While installing Windows 7, one of the steps is to a username and then you are given an option to either type a password for this username. You might not wish to type a password at that time, but now after that you installed Windows 7 and set it up, you are ready to create a password for your user account.

To create a password for a user account, follow the below steps:

Click on Start     > Control Panel

2.Under the User Accounts and Family Safety category, click on Add or remove user accounts

3.Choose the account that you would like to create a password for, this is done by clicking on the user account name.

4.The Change an Account page will open, click on Create a password


5.Type the password you want to set for this user account.


Remember to set a strong password, else it would be useless to have a password that anyone would guess

A strong password is considered to be :

  • Is at least eight characters long. These characters contain letters, digits and special characters such as ( $ , % , etc .. )
  • Does not contain your user name, real name, or company name.
  • Does not contain a complete word.
  • Is significantly different from previous passwords.
Actually its really up to you, you can have a password of a single character and you might be satisfied with it.
After you type your password and confirm it again, click on Create password button. If you are a person who usually forgets his passwords, then its better to type a password hint, so that when you forget your password, from reading the hint, it will give you an idea what your password is, but remember, password hint is visible to everyone who uses the computer, so make sure that your hint is not understood by someone else, choose your own hints.

Featured post

SBI Customer Care, 24x7 Toll Free Number

SBI Customer Care, 24x7 Toll Free Number SBI Customer Care, 24x7 Toll Free Number State Bank of India (SBI) is the largest bank of the co...

Featured