Showing posts with label technology. Show all posts

Saturday, 29 December 2018

How To Protect USB Pendrive With Password

Today in this computer environment, everything is based on data alteration that you functions within the compact memory storage device that is the memory card, pen drives, and Hard drive etc. But sometimes certain media storage device contains some sensitive data that we might not aspire to share with anyone so at such point, we have to hold our data protected in these manageable drives.

The excellent option is to preserve that drive with a protection like a password etc to keep the data safe in it. So we are here with How To Protect USB Pendrive With Password. By this, you will be able to encrypt your drive and protect your data from being hijacked by any unauthorized person. Just follow up the post below.

How To Protect USB Pendrive With Password

#1 Using BitLocker

Step 1. First of all, insert USB Pendrive into your computer. Now right click on the drive and select Turn on BitLocker.

Step 2. Now click on Use password to protect the drive. Now enter the password you want to set in both the password fields.
Step 3. Now click on next and next and print or save the key for future reference.
Step 4. Now encryption process will start and your drive will get secured with the password that you have set.

also We can Create Usb Security 
2.Wondershare                                                                                  3.DiskCryptor                                                                                    4.Usb Security          


Sunday, 30 September 2018

Magic Numbers: The Secret Codes that Programmers Hide in Your PC

Ever since the first person wrote out 5318008 on a calculator, nerds have been hiding secret numbers inside of your PC, and using them to negotiate secret handshakes between applications and files. Today we take a quick look at some of the more entertaining examples.

What are Magic Numbers?

Most programming languages use a 32-bit integer type to represent certain types of data behind the scenes — internally the number is stored in RAM or used by the CPU as 32 ones and zeros, but in the source code it would be written out in either regular decimal format, or as hexadecimal format, which uses the numbers 0 through 9 and the letters A through F.
When the operating system or an application wants to determine the type of a file, it can look to the beginning of the file for a special marker that signifies the type of the file. For instance, a PDF file might start with the hex value 0x255044462D312E33, which equals “%PDF-1.3” in ASCII format, or a ZIP file starts with 0x504B, which equals “PK”, which descends from the original PKZip utility. By looking at this “signature,” a file type can be easily identified even without any other metadata.
Compiled Java Class files start with CAFEBABE
The Linux utility “file” can be used from the terminal to determine the type of a file — in fact, it reads the magic numbers from a file called “magic.”
When an application wants to call a function, it can pass values to that function using standard types like integer, which can be expressed in the source code in hexadecimal format. This is especially true for constants, which are identifiers defined with human-readable names like AUTOSAVE_INTERVAL, but they map to actual integer (or other type) values. So instead of a programmer typing out a value like 60 every time they call the function in the source code, they could use the AUTOSAVE_INTERVAL constant for better readability. (Constants are usually easily recognized because they are written in all capital letters).
All of these examples can fall under the term Magic Numbers, because they might require a specific hexadecimal number in order for a function or file type to work properly… if the value isn’t correct it won’t work. And when a programmer wants to have a little fun, they might define these values using hexadecimal numbers that spell out something in English, otherwise known as hexspeak.

Fun With Magic Numbers: Some Notable Examples

Every AppleScript ends with FADEDEAD
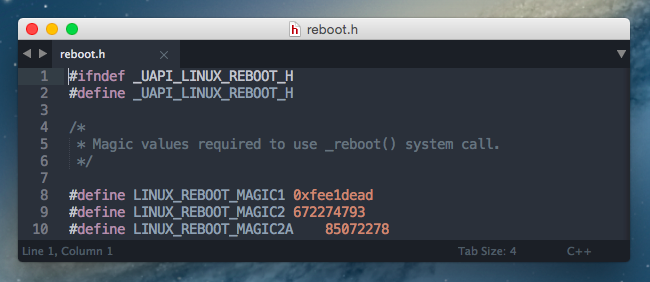
If you take a quick look into the Linux source code, you’ll see that the _reboot() system call on Linux requires a “magic” variable to be passed that equals the hexadecimal number 0xfee1dead. If something tried to call that function without passing in that magic value first, it would just return an error.
The GUID (globally unique identifier) for a BIOS boot partition in the GPT partitioning schemeis 21686148-6449-6E6F-744E-656564454649, which forms the ASCII string “Hah!IdontNeedEFI”, an allusion to the fact that GPT would normally be used in computers that replaced BIOS with UEFI, but it doesn’t necessarily have to be.
Microsoft famously hid 0x0B00B135 in their Hyper-V virtual-machine supporting source code submitted to Linux, then they changed the value to 0xB16B00B5, and finally they switched it to decimal before it was removed from the source code altogether.
More fun examples include:
  • 0xbaaaaaad – used by iOS crash logging to indicate that a log is a stackshot of the entire system.
  • 0xbad22222 – used by iOS crash logging to indicate that a VoIP app has been killed by iOS because it misbehaved.
  • 0x8badf00d – (Ate Bad Food) used by iOS crash logs to indicate that an application took too long to do something and was killed by the watchdog timeout.
  • 0xdeadfa11 – (Dead Fall) used by iOS crash logging when an app is force quit by a user.
  • 0xDEADD00D – used by Android to indicate a VM abort.
  • 0xDEAD10CC (Dead Lock) used by iOS crash logging when an application locks a resource in the background.
  • 0xBAADF00D (Bad Food) used by the LocalAlloc function in Windows for debugging.
  • 0xCAFED00D (Cafe dude) used by Java’s pack200 compression.
  • 0xCAFEBABE (Cafe babe) used by Java as the identifier for compiled class files
  • 0x0D15EA5E (Disease) used by Nintendo on the Gamecube and Wii to indicate a normal boot happened.
  • 0x1BADB002 (1 bad boot) used by the multiboot specification as a magic number
  • 0xDEADDEAD – used by Windows to indicate a manually initiated debug crash, otherwise known as the Blue Screen of Death.
These aren’t the only ones out there, of course, but just a short list of examples that seemed fun. Know of any more? Tell us in the comments.

Seeing Examples for Yourself

You can see more examples by opening up a hex editor and then opening up any number of file types. There are plenty of freeware hex editors available for Windows, OS X, or Linux — just make sure you are careful when installing freeware to not get infected with crapware or spyware.
As an added example, recovery images for Android phones like ClockworkMod start with “ANDROID!” if read in ASCII format.
img_5457b991ed819
Note: don’t go changing anything while you’re looking around. Hex editors can break things!

Source- How to geek

Tuesday, 11 September 2018

Converting VGA analog Video signals to digital HDMI TV signals

CONVERTING VGA TO HDMI


I remember playing around with electronic devices as a kid. Granted, we didn’t have as much to play with back then, but I’ve always been fascinated by electronic gadgets. I’d take things apart and put them back together again. I’d connect different things together to see what would happen; often to the detriment of the things I’d connected together. I guess that’s how I ended up being an engineer.

My son followed in my footsteps, at least as far as the curiosity was concerned. He didn’t become an engineer, but it sure looked like he was headed that way. Any time anything broke in the house, he’d want to take it apart and see what was inside. He had a whole box of components; circuit boards, cables, motors, buttons and lights he’d scavenged from different things. He’d hook them together, just to see what would happen. Of course, what usually happened was a flash and a spark, followed by the faint smell of smoke.

Somehow, we all seem to have this same idea, that we can just hook things together and expect them to work. While some of us learn that it isn’t quite that easy, there are others who keep on trying. If you don’t believe me, just look for adapters on e-Bay sometime. You can find adapter cables to connect just about any two devices that exist. That doesn’t necessarily mean they’ll work; but somebody will be selling them.

What keeps those adapter cables from working is that often the information being transmitted over the cables isn’t the same kind. What I mean by that is that the information which one device uses and the information that another device uses isn’t the same.


VGA Connector
VGA Connector
HDMI connectors
HDMI Type A Connector


Take VGA (video graphics array) and HDMI (high-definition multimedia interface) as an example. Since both of these are for video, it would seem logical that one should be able to connect them together, just by making a cable with the right connectors on both ends. However, nothing is farther from the truth. VGA and HDMI are extremely different systems, that don’t even talk the same language, even though they are both talking about video.

VGA was created as a video standard for computer monitors in 1987. By today’s standards, that’s just about ancient technology. On the other hand, HDMI was created in 2002, making it the most current video connection option available.


So, What’s the Difference Between VGA and HDMI?

Actually, there are lots of differences between VGA and HDMI. The first and probably most important is that VGA uses an analog signal and HDMI uses a digital one. Due to that, running a VGA signal directly into a HDMI connector on a monitor could actually damage it, because the analog signals is at a higher voltage level.


analog video signal
Analog Video Signal
digital video signal
Digital Video Signal


The second difference between VGA and HDMI is that VGA is just video, while HDMI contains channels for both video and stereo audio. So, when you connect them together, you need to bring the audio signal from the device which has the VGA connecter, via a separate cable, and connect it to the HDMI connector.

Another difference is that the wires in a VGA connector and the wires in a HDMI connector don’t match up. You can’t just connect the wire from pin #1 from one to pin #1 on the other and expect it to work, which is what those adapter cables do. In fact, you can’t connect the wire from pin #1 on the VGA connector to any of the pins on the HDMI connector, because they aren’t the same kind of signal.

Of course, the other big difference between the two is the native resolution between VGA and HDMI. When we use the term “native resolution” we’re talking about the actual number of rows and columns of pixels (dots of color) which appear on the screen. Many types of video equipment, from computer cards to monitors to video projectors can receive signals that are a higher or lower resolution, but it will always be presented in that native resolution.

Originally, VGA was created with four different graphics modes:

  • 640 x 480 pixels in 16 colors
  • 640 x 350 pixels in 16 colors
  • 320 x 200 pixels in 16 colors
  • 320 x 200 pixels in 256 colors

That may not seem like much, but the predecessor to VGA was CGA, which only had 320 x 200 pixels. So, stepping up to 640 x 480 was a great improvement. Since then many newer forms of VGA have been developed including:

  • SVGA (super VGA) which is 800 x 600 pixels
  • XGA (extended graphics array) which is 1024 x 768 pixels
  • WXGA (wide extended graphics array) which is typically 1280 x 768 or 1280 x 800 pixels, allowing for wide-screen monitors for movies

All of these different formats (and there are lot more than this) are still considered part of the VGA family. They all use the same D-subminiature connector and any sending device with this VGA connector can be connected to any display device which has a VGA D-subminiature connector.

HDMI, which was developed predominantly for use with HDTV, comes in two basic flavors:

  • 720p, which has 720 horizontal lines of pixels, making the actual resolution 1280 x 720
  • 1080p, which has 1080 horizontal lines of pixels, making the actual resolution 1920 x 1080

As you can see, WXGA and some of the even newer, larger VGA formats have as much resolution as HDMI does, but those aren’t common. Most VGA outputs today are SVGA or XGA, with their lower resolution.

When a monitor can’t display as many lines of pixels as is being presented to it, it either cuts off the edges of the image, or more commonly cuts out some of the rows and columns of pixels, allowing the image to be presented in a way that appears correct. If the monitor has the capability of displaying more lines of pixels than what is being presented to it, it duplicates rows and columns of pixels, making the image larger.

This process of changing the number of lines of resolution from an input signal is called “scaling.” The word scaling essentially means to make it appear the same, while changing the size. Since HDTV has more lines of resolution than a typical VGA signal, it is necessary to scale the signal at the same time it is being converted from analog to digital.


So, How do We get From VGA to HDMI?

It’s clear that a number of different things have to happen, all at the same time, to convert a VGA signal to HDMI; things that require more than connecting the two together. To do this, it is necessary to pass the VGA signal through a converter, which will take the VGA analog video signal and the stereo audio signals and convert them into digital signals which can then be sent out across a HDMI cable for connection to a monitor with a HDMI connector.

These converters “read” the analog signals being sent into them from your computer or other device, then create signals in digital which can be understood by your HDMI monitor. This process happens seamlessly, without any other input from you, other than connecting the device.

At the same time that these devices are converting the signal from analog to digital and from one format to another, they are scaling the image to fit the size and format of the monitor. This can also include the necessary scaling to accommodate widescreen monitor resolutions.

You must be careful when selecting one of these converters to insure that the device has the actual input connectors that you need. Some VGA to HDMI converters have what is known as a composite video input (a round, yellow “RCA” connector), others have a component video input (the three different colored “RCA” connectors), in either case, they’re trying to convert to a digital HDMI output. Although those input types aren’t technically “VGA” they are often referred to as VGA to HDMI converters.

VGA to HDMI converters can vary extensively, the major differences are:

  • Type or types of input connectors accepted (VGA, composite video, component video or S-video)
  • Native resolution accepted
  • The aspect ratio(s) that the converter can work with (standard 4:3 and widescreen 16:9)
  • Whether or not the converter also includes a switcher to allow for multiple inputs (multiple connections doesn’t automatically mean that it can switch between them)
  • Whether or not it has a DVI output connector as well (DVI has the same signal characteristics as the video part of HDMI, without the audio, in a different connector package)
  • Output resolution, 480i, 720p and/or 1080p
  • Power source
  • Whether or not the adaptor has TOSLINK optical digital audio connection capability
  • Whether the settings on the converter are purely automatic, manual, or automatic with manual override capability

Converting VGA analog Video signals to digital HDMI TV signals

CONVERTING VGA TO HDMI


I remember playing around with electronic devices as a kid. Granted, we didn’t have as much to play with back then, but I’ve always been fascinated by electronic gadgets. I’d take things apart and put them back together again. I’d connect different things together to see what would happen; often to the detriment of the things I’d connected together. I guess that’s how I ended up being an engineer.

My son followed in my footsteps, at least as far as the curiosity was concerned. He didn’t become an engineer, but it sure looked like he was headed that way. Any time anything broke in the house, he’d want to take it apart and see what was inside. He had a whole box of components; circuit boards, cables, motors, buttons and lights he’d scavenged from different things. He’d hook them together, just to see what would happen. Of course, what usually happened was a flash and a spark, followed by the faint smell of smoke.

Somehow, we all seem to have this same idea, that we can just hook things together and expect them to work. While some of us learn that it isn’t quite that easy, there are others who keep on trying. If you don’t believe me, just look for adapters on e-Bay sometime. You can find adapter cables to connect just about any two devices that exist. That doesn’t necessarily mean they’ll work; but somebody will be selling them.

What keeps those adapter cables from working is that often the information being transmitted over the cables isn’t the same kind. What I mean by that is that the information which one device uses and the information that another device uses isn’t the same.


VGA Connector
VGA Connector
HDMI connectors
HDMI Type A Connector


Take VGA (video graphics array) and HDMI (high-definition multimedia interface) as an example. Since both of these are for video, it would seem logical that one should be able to connect them together, just by making a cable with the right connectors on both ends. However, nothing is farther from the truth. VGA and HDMI are extremely different systems, that don’t even talk the same language, even though they are both talking about video.

VGA was created as a video standard for computer monitors in 1987. By today’s standards, that’s just about ancient technology. On the other hand, HDMI was created in 2002, making it the most current video connection option available.


So, What’s the Difference Between VGA and HDMI?

Actually, there are lots of differences between VGA and HDMI. The first and probably most important is that VGA uses an analog signal and HDMI uses a digital one. Due to that, running a VGA signal directly into a HDMI connector on a monitor could actually damage it, because the analog signals is at a higher voltage level.


analog video signal
Analog Video Signal
digital video signal
Digital Video Signal


The second difference between VGA and HDMI is that VGA is just video, while HDMI contains channels for both video and stereo audio. So, when you connect them together, you need to bring the audio signal from the device which has the VGA connecter, via a separate cable, and connect it to the HDMI connector.

Another difference is that the wires in a VGA connector and the wires in a HDMI connector don’t match up. You can’t just connect the wire from pin #1 from one to pin #1 on the other and expect it to work, which is what those adapter cables do. In fact, you can’t connect the wire from pin #1 on the VGA connector to any of the pins on the HDMI connector, because they aren’t the same kind of signal.

Of course, the other big difference between the two is the native resolution between VGA and HDMI. When we use the term “native resolution” we’re talking about the actual number of rows and columns of pixels (dots of color) which appear on the screen. Many types of video equipment, from computer cards to monitors to video projectors can receive signals that are a higher or lower resolution, but it will always be presented in that native resolution.

Originally, VGA was created with four different graphics modes:

  • 640 x 480 pixels in 16 colors
  • 640 x 350 pixels in 16 colors
  • 320 x 200 pixels in 16 colors
  • 320 x 200 pixels in 256 colors

That may not seem like much, but the predecessor to VGA was CGA, which only had 320 x 200 pixels. So, stepping up to 640 x 480 was a great improvement. Since then many newer forms of VGA have been developed including:

  • SVGA (super VGA) which is 800 x 600 pixels
  • XGA (extended graphics array) which is 1024 x 768 pixels
  • WXGA (wide extended graphics array) which is typically 1280 x 768 or 1280 x 800 pixels, allowing for wide-screen monitors for movies

All of these different formats (and there are lot more than this) are still considered part of the VGA family. They all use the same D-subminiature connector and any sending device with this VGA connector can be connected to any display device which has a VGA D-subminiature connector.

HDMI, which was developed predominantly for use with HDTV, comes in two basic flavors:

  • 720p, which has 720 horizontal lines of pixels, making the actual resolution 1280 x 720
  • 1080p, which has 1080 horizontal lines of pixels, making the actual resolution 1920 x 1080

As you can see, WXGA and some of the even newer, larger VGA formats have as much resolution as HDMI does, but those aren’t common. Most VGA outputs today are SVGA or XGA, with their lower resolution.

When a monitor can’t display as many lines of pixels as is being presented to it, it either cuts off the edges of the image, or more commonly cuts out some of the rows and columns of pixels, allowing the image to be presented in a way that appears correct. If the monitor has the capability of displaying more lines of pixels than what is being presented to it, it duplicates rows and columns of pixels, making the image larger.

This process of changing the number of lines of resolution from an input signal is called “scaling.” The word scaling essentially means to make it appear the same, while changing the size. Since HDTV has more lines of resolution than a typical VGA signal, it is necessary to scale the signal at the same time it is being converted from analog to digital.


So, How do We get From VGA to HDMI?

It’s clear that a number of different things have to happen, all at the same time, to convert a VGA signal to HDMI; things that require more than connecting the two together. To do this, it is necessary to pass the VGA signal through a converter, which will take the VGA analog video signal and the stereo audio signals and convert them into digital signals which can then be sent out across a HDMI cable for connection to a monitor with a HDMI connector.

These converters “read” the analog signals being sent into them from your computer or other device, then create signals in digital which can be understood by your HDMI monitor. This process happens seamlessly, without any other input from you, other than connecting the device.

At the same time that these devices are converting the signal from analog to digital and from one format to another, they are scaling the image to fit the size and format of the monitor. This can also include the necessary scaling to accommodate widescreen monitor resolutions.

You must be careful when selecting one of these converters to insure that the device has the actual input connectors that you need. Some VGA to HDMI converters have what is known as a composite video input (a round, yellow “RCA” connector), others have a component video input (the three different colored “RCA” connectors), in either case, they’re trying to convert to a digital HDMI output. Although those input types aren’t technically “VGA” they are often referred to as VGA to HDMI converters.

VGA to HDMI converters can vary extensively, the major differences are:

  • Type or types of input connectors accepted (VGA, composite video, component video or S-video)
  • Native resolution accepted
  • The aspect ratio(s) that the converter can work with (standard 4:3 and widescreen 16:9)
  • Whether or not the converter also includes a switcher to allow for multiple inputs (multiple connections doesn’t automatically mean that it can switch between them)
  • Whether or not it has a DVI output connector as well (DVI has the same signal characteristics as the video part of HDMI, without the audio, in a different connector package)
  • Output resolution, 480i, 720p and/or 1080p
  • Power source
  • Whether or not the adaptor has TOSLINK optical digital audio connection capability
  • Whether the settings on the converter are purely automatic, manual, or automatic with manual override capability

How To Troubleshoot HDMI Connection Problems


Image result for HDMI


HDMI is the main way to connect multiple components such in a home theater setup, including TVs, video projectors, Ultra HD and Blu-ray Disc players, receivers, media streamers, and even cable/satellite boxes. When an HDMI connection goes wrong, there are some things you can do to that, in most cases, will fix it.


Copy-Protection and the HDMI Handshake
One purpose of HDMI is to make it an easier to connect all your components together by using one cable for both audio and video. However, there is another purpose for the implementation of the HDMI: copy-protection (known as HDCP and for 4K HDCP 2.2). This copy protection standard requires that HDMI connected components be able to recognize and communicate with each other.


This ability to recognize and communicate is referred to as the HDMI handshake. If the 'handshake' doesn't work, the HDCP encryption that is embedded in the HDMI signal is not recognized properly by one, or more, of the connected components. This most often results in you not being able to see anything on a TV screen.

Before frustration sets in, there are some things you can do yourself if you find that your HDMI-connected components are not communicating properly.

HDMI Troubleshooting Tips
Here is a list of the key things you can do to correct HDMI connection problems before letting the panic set in.

Check Your HDMI Cable Connections: HDMI connections don't fit as tight as a component or composite video connections and can slip out sometimes if the equipment is moved slightly. If this is a problem – consider getting locks for your HDMI cables or get self-locking HDMI cables – Buy From Amazon.
Try A Different Turn-on Sequence For Your Components: If you have a habit of turning on your TV first, then your Blu-ray Disc player, or other HDMI source component, try the reverse turn-on sequence and see if that works. Also, if you have a Blu-ray Disc player, or another component, connected to a home theater receiver and then to the TV – try different startup combinations and see if that works. If you find a sequence that works, remember it. Of course, make sure when everything is turned on, and that you have selected the correct input on your TV that the Blu-ray Disc player, or another source component, is connected to.

However, if changing the turn-on sequence of your TV and connected components doesn't seem to do the trick, with both the TV and source component on, just try switching to another input on the TV and then switch back to HDMI and see if the signal locks incorrectly.

Once you have determined the best turn-on sequence – write it down for future reference.


Check Your Source Device's Video Resolution Output Setting: If your Blu-ray Disc player or other HDMI source device has a video resolution output setting menu, check to see if it is set to AUTO. If so, reset it to match the native resolution of your TV or video projector (such as 720p, 1080p, or 4K, if you have 4K-capable TV or video projector) and see if that provides a more stable result.
Use The Process Of Elimination: If you have a Blu-ray Disc player (or another HDMI source) connected to a home theater receiver to a TV and you still don't get anything to show up your TV screen regardless of the turn on the sequence you try, use the process of elimination. Connect the Blu-ray Disc (or another HDMI source) directly to the TV. This bypasses the home theater receiver. See if that does the trick. If so, the home theater receiver, or the HDMI source component/home theater receiver combination is most likely the culprit. What you can do now is keep the HDMI source connected directly to your TV and then make a separate audio connection from your source device (such as a Blu-ray Disc player) to your home theater receiver. This is not necessarily the most efficient connection method, but you can still use the separate video and audio connection workaround a the best option for the time being, or as a permanent solution if you prefer.

Check For Firmware Updates: If you find that none of the above solutions work or work consistently – check to see if there are any announced firmware updates for your HDMI source and home theater receiver (or even your TV) that may resolve this issue. Also, check to see there have been complaints filed or posted by other users regarding HDMI handshake issues with your components.
The HDR Factor
The implementation of HDR on an increasing number of 4K Ultra HD TVs may also cause connection glitches.

If you have an HDR-enabled source device, such as a UHD Blu-ray Disc player or Media Streamer connected to an HDR-compatible TV/Video projector and are attempting to access compatible HDR-encoded content, you may run into a situation where the TV/Video Projector may not recognize the HDR content.


When an HDR TV or Video Projector detects an incoming HDR signal, a brief confirmation indicator should appear on the top left or right corner of the screen. If you do not see this indicator, or see a displayed message by the TV or source component that states that you need to connect the HDR source to an HDR-compatible TV or if a message that states that the incoming signal has been downgraded to 1080p due to the lack of proper HDR detection, there are ways that you may be able to correct this issue.

Make sure you are using Hi-Speed HDMI cables (at least 10.2 Gbps rated - with 18 Gbps preferred).
If you have your HDR source routed through a home theater receiver to a compatible TV/Video projector, make sure your home theater receiver is also HDR compatible.
Access your source device's video resolution output settings and see it is set to AUTO. If so, change the resolution output setting to 4K (sometimes labeled 4K/2K) and see if that corrects the problem. The reason that this problem occurs is that the firmware of the TV/Video projector may not be reading the HDR signal correctly when the video resolution setting output is set to AUTO, so changing the source device's setting to 4K may correct the problem. Check your TV/Video Projector has the most recent firmware update.
If possible, upgrade all your HDMI cables to ones that support 18 Gbps transfer speed. This doesn't make a difference with the handshake issue, but it does solve the problem with any new or future HDMI features you may need.

After changing your settings, and upgrading your cables, if your TV/Video projector is still not recognizing your HDR source, then content tech support for your TV/Video projector, or even your source device(s), and see if they can address the issue.
Troubleshooting HDMI-to-DVI or DVI-to-HDMI Connection Problems
Another HDMI connection issue sometimes arises when it is necessary to connect an HDMI-enabled device to a TV or monitor that has a DVI connection, or a DVI-enabled source device to an HDMI-equipped TV.

In this case, you need to use an HDMI-to-DVI conversion cable (HDMI on one end – DVI on the other) or use an HDMI cable with an added HDMI-to-DVI adapter or a DVI cable with a DVI-to-HDMI adapter. Check out examples of DVI/HDMI adapters and cables on Amazon.com

The added requirement is that the DVI-equipped device you are connecting is HDCP-enabled. This allows the proper communication between both the HDMI and DVI devices.

One other thing to point out is that where HDMI can pass both video and audio signals, DVI connections can only pass video signals. This means if you successfully connect an HDMI source component to a DVI equipped TV, you still have to make a separate connection to access audio. Depending on the TV, this may be done either via RCA or 3.5mm audio connection.

Ordinarily, there should not be a problem converting HDMI to DVI, but there can be. For example, you will find that 3D and 4K signals are not compatible. With standard 480p, 720p, or 1080p resolution video signals, most of the time this is successful, but you may have the experience where some adapters and conversion cables don't work as advertised. If you encounter this problem, it may not necessarily be the TV or another component. You may have to try a couple of different branded adapters or cables.

You may also run into a situation on older-DVI equipped TVs, even if they are HDCP compliant, may not have the proper firmware to recognize the identity of the HDMI source component you are trying to connect. If you run into this situation a call to tech support for your TV or source component is a good idea before proceeding further.

Connecting Your PC/Laptop to a TV Using HDMI
With more consumers using their PC or Laptop as a home theater source component, problems can arise when trying to connect an HDMI-equipped PC/Laptop to an HDMI-equipped TV. Make sure that you go into your PC/Laptop settings and designate HDMI as the default output connection. If you can't get an image from your laptop to show up on your TV screen, try the following:

Try booting up your PC/Laptop with the HDMI cable connected to a TV that is on.
You can try booting up the PC/Laptop while the TV is off and then turn on the TV.
If the above options don't work, try booting up the PC/Laptop first, and, with the TV on then connect the HDMI cable to both the PC/Laptop and TV.
If you unsuccessful connecting your PC to your TV using an HDMI cable, if the TV has a VGA input, you may have to use that instead.

HDMI Without Cables
Another form of HDMI connectivity that is available is "Wireless HDMI". This is most commonly done by an HDMI cable coming out of source device (Blu-ray Player, Media Streamer, Cable/Satellite Box) to an external transmitter that sends the audio/video signal wirelessly to a receiver, that, in turn, is connected to a TV or video projector using a short HDMI cable. Currently, there are two competing "wireless HDMI" format, each supporting their own group of products: WHDI and Wireless HD (WiHD).

On the one hand, both of these options are intended to make it more convenient to connect HDMI sources and displays without an unsightly HDMI cable (especially if your TV or video projector is across the room). However, just as with traditional wired HDMI connectivity, there can be "quirks" such as distance, line-of-site issues, and interference (depending on whether you are using WHDI or WiHD.

Also, there are differences on how both methods may be implemented on a brand and model level, such as whether some surround sound formats and 3D can be accommodated, and, most "wireless HDMI" transmitters/receivers are not 4K compatible, but, as of 2015, this is starting to be implemented.

If you install a "wireless HDMI" connection option and you find that it is isn't working properly, the first thing to do is try changing the position, distance, and component turn-on sequence and see if that solves the problem.

If you find that following those setup that issue cannot be resolved, contact Tech Support for your specific "wireless HDMI" connection product. If that still does not solve the problem, the "stability" of a traditionally wired HDMI connection setup might work best for you. For long distances, there are also additional HDMI connection options to consider.

The Bottom Line
Love it or hate it, HDMI is the default interface used for connecting home theater components together. It was originally designed to provide a single, convenient, connection for both audio and video, with built-in copy-protection and the added ability to be upgraded over time. However, due to the fact that both the source and display devices have to communicate and recognize each other and encoded content has to be properly detected, glitches can occur. However, following the practical steps outlined above can solve most HDMI connection issues.

Featured post

SBI Customer Care, 24x7 Toll Free Number

SBI Customer Care, 24x7 Toll Free Number SBI Customer Care, 24x7 Toll Free Number State Bank of India (SBI) is the largest bank of the co...

Featured