Showing posts with label pc tricks. Show all posts

Friday, 7 December 2018

Fix Connection Failed with Error 651 in Windows 7,8,10

Today we are going to share some information about Error 651 and its solutions. So the topic of our today’s article is Error 651 – Fix Connection Failed with Error 651 in Windows 7,8,10. Please read the whole article to get it properly.


Fix Connection Failed With Error 651 in Windows 7,8,10

Below given solutions are not tricks or any official solution, these are some troubleshooting methods which you can try to fix your error 651.

For various PC problems, we recommend this tool.
This software will repair common computer errors, protect you from file loss, malware, hardware failure and optimize your PC for maximum performance. Fix PC issues now in 3 easy steps:
  1. Download this PC Repair Tool rated "Excellent" on TrustPilot.com.
  2. Click “Start Scan” to find Windows issues that could be causing PC problems.
  3. Click “Repair All” to fix issues with Patented Technologies (Exclusive Discount for our readers).

Steps to boot PC in safe mode

  • Just Restart your PC first.
  • If restarting process have been completed then tap the F8 key.
  • Now you will see the Advanced Boot Options menu.
  • Use Up and Down keys to Highlight your selection.
  • Now select Safe Mode with Networking from there and press ENTER.
  • You will see that drivers are loading.
  • Then you will see A Welcome screen.
  • Now log on to your computer using an account with administer privileges.
  • With this you are all done.
So, these were some troubleshooting methods which can help you in Error 651 – Fix Connection Failed with Error 651 in Windows.

Fix Connection Failed With Error 651 in Windows 7,8,10

1. Enter Safe Boot

  1. You will need to restart your Windows 8.1 or Windows 10 and log in to your Safe Mode with networking feature in order to apply the following changes.
  2. While in Safe mode you need press and hold the “Windows” button and the “R” button.
  3. A “Run” window will appear.
  4. Write in the “Run” window the following command “MSCONFIG”.
  5. Press the “Enter” button on the keyboard.
  6. Now another window will show and you will need to left click on the “Boot” tab situated in the upper side of that window.
  7. In the topic “Boot options” you need to left click on “Safe boot”.safe boot windows pc
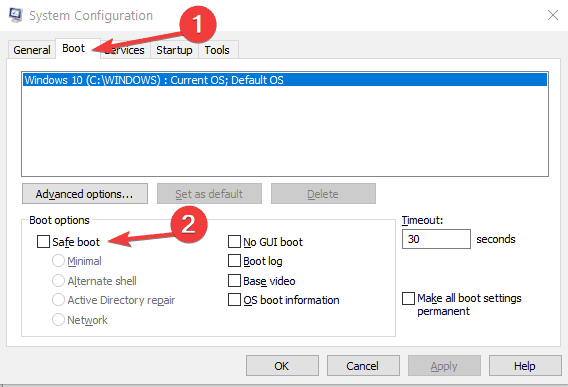
  8. Check the box next to “Network” under the “options” section of the page.
  9. Reboot your Windows 8.1 or Windows 10 device and check if you still have the error 651 appearing in your system

Fix Connection Failed With Error 651 in Windows 7,8,10


2. Disable all startup services

  1. Press and hold the “Windows” button and the “R” button.
  2. In the “Run” window that appeared write “MSCONFIG”.
  3. Press the “Enter” button on the keyboard.
  4. Left click on the “Boot” tab.
  5. Uncheck the box next to “Safe mode”.
  6. Left click on the “General” tab.
  7. From the features you have there you need to go to “Selective Startup”
  8. Uncheck the features to clear the selections.
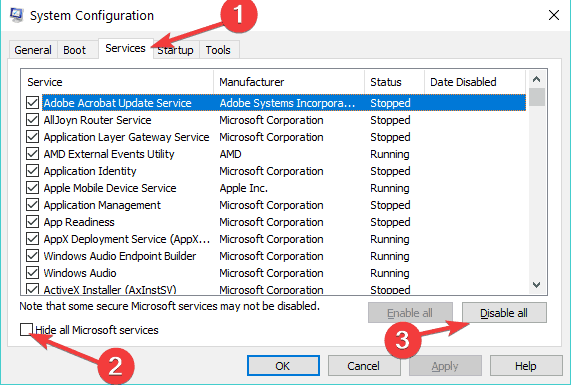
  9. Left click on the “Services” feature and left click again on “Disable all” button.disable startup programs
  10. Left click on the “Startup” tab and disable each item you have in that list.
  11. Reboot your Windows 8.1 or Windows 10 device.
  12. After the device reboots go again to the “MSCONFIG” window as you did above.
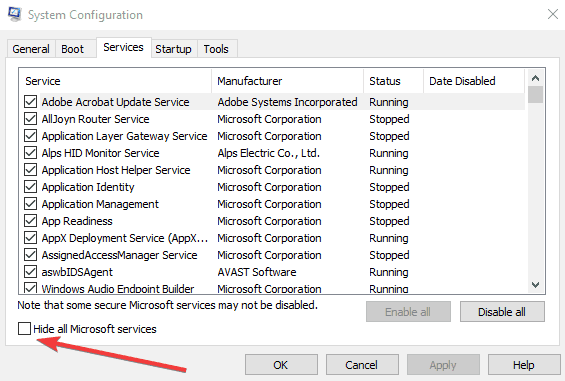
  13. Left click on the “Services” tab.
  14. Left click on the “Hide all Microsoft services” feature.hide all microsoft services
  15. Left click on the “OK” button you have on that window.
  16. Reboot your Windows 8.1 or Windows 10 device again.
  17. Check to see if you still have this issue.
  18. If you don’t have this error anymore it means that one of your startup apps is causing the error 651 issue.
  19. If you still have these issues go back to the “MSCONFIG” window.
  20. Left click on the “General” tab.
  21. Left click on “Normal Startup” feature.
  22. Choose to Reboot the Windows 8.1 or Windows 10 device.
  23. Fix Connection Failed With Error 651 in Windows 7,8,10

Tuesday, 4 December 2018

Free Netflix Account Username & Password 2019

Free Netflix Account & Passwords 2018, and some methods that can help you enjoy the Netflix videos for free. Go through the post to know about it.


Free Netflix Account Username & Password Generator 2018
You can access Netflix from your iPhone, Android, Tablets, Computers, Smart TVs, Gaming Consoles etc. Since 2007 Netflix has grown its services over the world, now it is available in more than 190 countries like Australia, United Kingdom, Japan, and India.


However, you can only use Netflix after paying some bucks. Therefore, we have decided to share some methods that can help you enjoy the Netflix videos for free. Let’s know about it.

Using Free Trial Month

Well, if you are a new user then you can use a free trial month. After one month you need to provide your credit card details to enjoy the services. So, to activate the free trial month you need to follow the methods.
Step 1. First of all, you need to visit www.netflix.com from your computer browser. Now You need to click on “Join Free For a Month” that is located on the homepage itself.

Using Free Trial Month

Step 2. In the next step you need to choose the plans, simply choose the one.

Using Free Trial Month

Step 3. Now You need to create your account. Enter your email address and password to continue.

Using Free Trial Month

Step 4. Now you need to enter your payment details to continue.

ITECHEVER

That’s it! You have created a free trial account. Now you will be charged according to your selected plans on monthly basis. Therefore, you need to cancel your membership before your free trial ends.

Canceling The Membership:

If you’re sick of Netflix or the free one-month subscription is nearly over and you don’t want to start paying for the service, you can easily cancel it. You just need to head over to the Netflix cancellation page and select Finish Cancellation.
You can also click on your profile image and from the drop down select “Your Account”. Now under “Membership and Billing” just select “Cancel Membership” option. That’s it! You are done.

Free Netflix Accounts 2018

There are few premium accounts are available which you can use to watch the latest movie and tv shows without any interruption. These accounts are mostly generated by NetFlix Premium account generator. We have managed to find out the list of username and passwords of the accounts.
Note: We do not take guarantee that below listed usernames and password of NetFlix are still working because these accounts are being accessed by numbers of users. Some accounts might be banned, or users changed the passwords. We are working hard to update more Netflix usernames and passwords. Here is the list of ID/PASSWORDS that might work.
tjs1966@gmail.com
Password: danbrown2
ddffarriaga@gmail.com
Password: maffrmota2
remaclefamily@gmail.com
Password: substation232
mattsirois20@gmail.com
Password: diecast8
nataliyva.herus@gmail.com
Password: 17737271888
jrrllicey@hotmail.com
Password: 123456
eeyidogan@hotmail.com
Password: 517454614
ricardoisidoro@bol.com.br
Password: 008249
barxky1976@yahoo.com
Password: interview0929
will.brand@gmail.com
Password: 111961982
ijuvota@gmail.com
Password: cdefgahc
forshee@oasisband.net
Password: qwerty7
emilybeswan98@gmail.com
Password: emily098
wilsonwendy@yahoo.com
Password: wendy65@
measondewin8@yahoo.com
Password: 88@melvik
jismathdewin87@aol.com
Password: segg987

Thursday, 29 November 2018

How Convert YouTube to MP3 With OnlineConverter


2.Copy and paste the video link that you want to convert.


3.Select ".mp3" in the format field.


4.Click the "Start" button to initiate the conversion.

5.When the conversion is done, download the file from the link provided.


Tags-how to convert youtube to mp3
best youtube to mp3 converter
youtube converter mp4
youtube to mp3 shark
youtube to mp3 songs download free
youtube to mp3 app
youtube to mp3 320kbps
mp3 downloader
mp3 converter app

Saturday, 24 November 2018

How to Recover Deleted Facebook Messages?

There’s nothing more frustrating than the situation when we wrongly delete some important messages and we don’t know how to recover them. If you ever faced this problem, then you probably looking for a way to retrieve those messages. Luckily, there are a number of ways in which you can use to recover deleted messages on facebook. So, without wasting any more time, let’s start exploring how to retrieve deleted facebook messages.


How to Recover Deleted Facebook Messages?

As we have mentioned above that there are a number of ways which can be used to recover deleted messages, but all of them require different setup depending on your device type. So, we have divided the whole guide into different parts as follows:


1. How to Recover Deleted Facebook Messages on Android
Facebook messenger has a feature known as “Off the Internet” which allows your device to save your facebook messages even after being deleted from your device. So, it’s quite simple to recover deleted messages on your android phone using some simple steps.
Click on the below link and install ES File Explorer on your Android device.


DownloadQR-Code
ES Datei Explorer
Developer: ES Global
Price: Free+

Launch the Es File Explorer on your device.
Navigate to SD card or Internal Storage option (it depends on where your device saves your data).
From there, go to Android>Data.

Inside the Data option, you will find “com.facebook.orca” folder.
Open the folder and open files > fb_temp folder where you will find all the 


deleted files and messages.

Note:- Sometimes this method not work for you, then you can try below-given method.


2. How to Recover Deleted Facebook Messages Using the Archive Option?

An archive is an excellent option which helps you to save your messages from any future mishappenings. Using the feature, you can secure your messages and you can use it on any platform including Facebook Messanger, website or even on the Facebook app.
Open the Facebook messenger app.
Find the long press on the chat which you want to archive.
A new menu will appear on your screen.
From the menu, you have to select the “Archive” option.
The chat will be transferred to the archive and you can recover them whenever you need it.


3. How to Retrieve Deleted Facebook Messages by Downloading the Archive?

After saving the chats to an archive, then you can download them whenever it’s required. Here are the steps which will help you to do so:
Log in to your Facebook account from a computer.
Click on the bottom facing arrow which you will find at the upper-right corner.


Select “Settings” from the available options.
Navigate to Account Settings and then click on it.
Under the General settings, you have to click on the “Download a copy of my Facebook data” option.
On the next page, just select “Start my Archive” option.
This will open a confirmation tab where you have to click on the “Start my Archive” option again.
After that, you will have to click on a link represented as your Archive link.


Enter your password and then click on “Download my Archive button.
As soon as the Archive downloads, unzip it and then open the file named as an index.
On the next screen, click on the “Messages” option and you will find all the messages inside it.
Final Words

So, Above are the best methods which you can use to recover deleted Facebook messages. I hope this post will help you to recover deleted messages. If you liked this guide, then share it with your friends who are looking for the same. Also, if you have any questions to ask, then feel free to contact us through the comment section below


Wednesday, 21 November 2018

Top 5 Best Chrome Extensions for Productivity

Best Chrome Extensions


Top 5 Best Chrome Extensions for Productivity you must try. Chrome Browser is certainly the most popular web browser out there whether it be for desktops or our smartphones. And, no doubt there’s a big reason behind it as well. And that is Google. When it comes to the desktop version of the browser, there’s one amazing feature that certainly comes in handy. And that is Chrome Web extensions. Yes, web extensions not only provide you with some handy and cool features, but they can also help you get rid of ads and do much other amazing stuff which would have been quite difficult otherwise.


So, here we list 5 different Chrome Web Extensions that will help you in the long run and your day to day activities. So, here we go
1) Google Keep:

Keep is Google’s very own note making app. The best thing about the app is its minimalist design and easy to use interface. Unlike other note taking apps, it doesn’t have any kind of hoggy boggy features but suffices your needs. And the best part about it is that it has an app available for Android and iOS which will make sure that your notes keep synced across all your devices.
2) StayFocused:


StayFocused is an app that has a self-explanatory name. It certainly aims to keep you away from distractions while at work. It has also gas in-built app timer feature which allows you to set a fixed maximum limit time for usage of an app on a daily basis. And when you run out of time, you will only be able to use the app again the following day. The only way to unblock will be uninstalling the extension but that will surely defeat its motive.
3) LastPass:

Do you have a hard time remembering all your account passwords? Are you tired of always resetting your password as you forget it too often and wastes your precious time? Then this app is made for you. The app is a one-stop storage for all your different account passwords across different sites, you can save all your passwords here and the app will do the rest for you. The app also does auto-login on your behalf and gives strong password suggestions based on your usage.
4) OneTab:


Did you find your browser cluttered and cumbersome to use when you have too many tabs open? Well, this extension provides a decent fix for this. What it does is it converts all your open tabs into a list, which saves more than 95% of your memory and makes your experience more smoother and faster as it reduces the CPU load.
5) Save to Pocket:

Save to Pocket works as a very handy extension when it comes to the browsing experience. The extension works as a tool to quickly bookmark websites and articles that you want to read later. So, that you can have a look at them in your spare time. The app works in a basic manner and will surely improve your browsing and reading experience over the internet. With its Android/iOS app, you can also sync it across all your devices easily for later offline usage.

Monday, 19 November 2018

How to Convert iTunes Songs to MP3


Even though they're both digital music, the songs you buy from the iTunes Storearen't MP3s. People often use the term "MP3" as a generic name to refer to all digital music files, but that's not quite right. MP3 actually refers to a very specific type of music file.


The songs you get from iTunes may not be MP3s, but you can use a tool built into iTunes to convert songs from the iTunes Store format to MP3 in just a few steps. Here's what you need to know.

The iTunes Store Music Format: AAC, Not MP3


Songs purchased from the iTunes Store come in the AAC format. While both AAC and MP3 are digital audio files, AAC is a newer format designed to provide better sound from files that take up as much storage as, or even less than, MP3s.


Since music from iTunes comes as AAC, many people believe it is a proprietary Apple format. It's not. AAC is a standard format available to virtually anyone. AAC files work with all Apple products and products from many, many other companies, too. Still, not every MP3 player supports them, so if you want to play AACs on those devices, you need to convert the iTunes songs to the MP3 format.


There are a lot of audio programs that can perform this conversion, but since you've already got iTunes on your computer, using it is probably easiest. These instructions cover using iTunes to convert songs from the iTunes Store to MP3.

5 Steps to Converting iTunes Songs to MP3


Begin by making sure your conversion settings are set to create MP3s. Here is a full tutorial on how to do that, but the quick version is: open iTunes Preferences, click Import Settings in the General tab, and select MP3 Encoder.


In iTunes, find the song or songs you want to convert to MP3 and click on them. You can highlight one song at a time, groups of song or albums (select the first song, hold the Shift key, and select the last song), or even discontiguous songs (hold down the Command key on a Mac or Control on a PC and then click the songs).


When the songs you want to convert are highlighted, click the File menu in iTunes


Click on Convert (in some older versions of iTunes, look for Create New Version)


Click Create MP3 Version. This converts the iTunes songs to MP3 files for use on other kinds of MP3 players (they'll still work on Apple devices, too). It actually creates two files: The new MP3 file appears next to the AAC version in iTunes.

What About Apple Music Songs?


These instructions apply to songs you buy from the iTunes Store, but who buys music anymore? We all stream it, right? So what about songs you've got on your computer from Apple Music? Can they be converted to MP3?


The answer is no. While Apple Music songs use the AAC format, they're a specially protected version of it that uses DRM. This is done to make sure that you have a valid Apple Music subscription in order to play them. Otherwise, you could download a bunch of songs, convert them to MP3, cancel your subscription, and keep the music. Apple (or any streaming-music company) doesn't want to let you do that.

How to Tell iTunes and MP3 Files Apart


Once you've got both the AAC and MP3 versions of a song in iTunes, it's not easy to tell them apart. They just look like two copies of the same song. But every file in iTunes has information about the song stored in it, such as its artist, length, size, and file type. To find out which file is the MP3 and which is the AAC, read about How To Change ID3 Tags Like Artist, Genre & Other Song Info in iTunes.

What to Do With Unwanted or Duplicate Songs


If you've converted your music to MP3, you may not want the AAC version of the song taking up space on your hard drive. If so, you can delete the song from iTunes. You can even use features in iTunes to find all duplicate versions of songs to make the cleaning-up process easier.


Since the iTunes Store version of the file is the original, make sure it's backed up before you delete it. All of your iTunes purchases should be available to redownload via iCloud. Confirm that the song is there if you need it and then you're free to delete.

Be Aware: Converting Can Reduce Sound Quality


Before you convert from iTunes to MP3, it's important to know that doing this slightly reduces the audio quality of the song. The reason for this is that both AAC and MP3 are compressed versions of the original song file (raw audio files can be 10 times larger than the MP3 or AAC). Some quality is lost during the compression that created the original AAC or MP3 in order to make those files smaller than the original. Converting from AAC or MP3 to another compressed format means there will be even more compression and more loss of quality. While the quality change may be so small that you probably won't notice it, if you convert the same song too many times it may eventually start to sound worse.

Monday, 12 November 2018

How to Get the Scroll Lock Light off Your Keyboard

How to Get the Scroll Lock Light off Your Keyboard


Scroll lock is one of the more esoteric settings on a computer keyboard today. It's often the third light on a keyboard, represented by a down arrow with a line under it on the keyboard. Turn the scroll lock light off by hitting the scroll lock button to toggle scroll lock mode itself off.


How Scroll Lock Works
Scroll lock is a mode on a computer that adjusts how scrolling through a set of data works.

Originally, when scroll lock was introduced in the early 1980s, scroll lock was set up to adjust whether using the arrow keys on the keyboard would scroll the page or simply move the cursor. When scroll lock was activated by hitting a scroll lock key on the keyboard, only the cursor would move. The key quickly became standard on PC keyboards.


Toggling Scroll and Other Locks
Many keyboards have a "Scroll Lock" key, a "Caps Lock" key and a "Num Lock" key and a corresponding light for each lock key. The light comes on when the lock mode is on.
Find the "Scroll Lock" key on your keyboard and press it to turn scroll lock on or off. On some keyboards, it may be present as a second function you can access by holding down the "Fn" or "Function" key. Do the same for caps or num lock.

What the Other Locks Do
When caps lock is enabled, each letter you hit will generally come out capitalized. This is often easier for typing a long string of capitalized text than holding down the shift key.


Num lock means that the number keypad will work to type numbers rather than as an extra set of arrow keys. It's only present on keyboards with a number keypad, so it's absent on many laptops.

Some programs may use any of these keys for other purposes, and some people purposely set their computers to use the keys for other purposes.


it's still used by some programs, though computer mice and scroll wheels have made it less applicable than it once was. In Microsoft Excel and other spreadsheet programs, turning scroll lock on will cause the arrow keys to scroll a spreadsheet up and down rather than moving from one cell to another. This can be more efficient if you want to jump through the spreadsheet while keeping a particular cell selected without having to reach for the mouse.


Some people and programs use the scroll lock key for totally different purposes, essentially using it as a spare key on the keyboard. You can remap the key to another purpose in most operating systems and in some particular programs.


Monday, 17 September 2018

how to send whatsapp without adding contact


Now you can send WhatsApp message to anyone who is not in your phone’s contacts. You can do it in two different ways which we are gonna see in this answer. Let’s get started.


Method 1: Recommended Method

Install WhatsDirect App from Google Play Store.

Accept the Terms & Conditions of the app by tapping “Continue” button.

You can see a tutorial now which you can skip or go through it.

Now you should be on the main screen.

Type the phone number along with the country code (see screenshot). 91 is the country code and the remaining is the phone number. you don’t need to enter any special characters such as “+”

Type the message you want.

Now hit the “Send Text” button on the app.

It will take you to the WhatsApp app. If you wish, you can edit your message there. Now hit the “Send” icon to send the message.

Method 2:

Open the web browser and then paste the following on the Address bar: https://api.WhatsApp.com/send?ph...

In the place of “number”, you need to provide the phone number with the country code (don’t enter any special characters).

For instance, you need to provide the number like this: https://api.WhatsApp.com/send?ph...

Click on “Message” button.

It will take you to the WhatsApp Web. Scan the QR code to log in (open WhatsApp on your phone > tap Overflow menu > WhatsApp Web).


Now you can see that a chat is opened for the number you provide.

Tuesday, 11 September 2018

Top 10: Best Video Editing Software for

Don’t know how to edit videos, have a video studio, or have a bona fide video specialist to shoot and cut your features? That’s alright! The goal of today’s blog is to show you that with the right video editing software, you too can churn out sleek, professional video content—regardless of experience—and keep your content strategy ahead of the curve.
Let’s dive in! Here are our top 10 best pieces of video editing software for beginners—from cheapest (i.e. free!) to most expensive.

1. Apple iMovie 

Best Video Editing Software For Beginners iMovie
Ok—so to those of you working with PCs, this one won’t really apply; but we’d remiss to leave it off the list. If you’re looking for simplicity and elegance, it doesn’t get much better than Apple iMovie. iMovie’s ten high-fidelity filters are some of the classiest in the video editing game; and if you’re shooting on your iPhone, or have been editing a project on your iPad, you can use AirDrop to wirelessly and seamlessly transfer your project over to your Mac.
One of iMovie’s most coveted features is its green-screen, or “chroma-key” tool, which allows you to place your characters in exotic locations—Hawaii, say—at a moment’s notice. Want to overlay the scene with “Somewhere Over the Rainbow”? iMovie ties directly in with iTunes and GarageBand, so you can easily implement custom tracks and sounds. When your movie’s finally ready to ship, release it into the wild using iMessage, Facebook, YouTube, or any other of iMovie’s succinctly connected platforms.
Standout Features: Seamless Apple product integration; green-screen; audio and social platform integration
Pricing: Free with the purchase of a Mac

2. Lumen5: How to Edit Videos Without Much Technical Ability

Best Video Editing Software For Beginners Lumen5
We’ll put this more in the category of a video editing “tool” than video editing software, but for social media marketers who want to create fun, flashy social promos in the blink of an eye, Lumen5 is a no brainer. Here’s a short little feature we made for a recent blog post, 14 Fun & Festive Holiday Marketing Ideas for 2017:  
Lumen5 markets itself as a tool that turns blog posts into social promos. While the process isn’t perfect, and you’ll likely have to do some tinkering to get your blog content looking just the way you want it, the rest of the video creation process is a cinch. Merely refine some copy that teases your blog post; drag and drop some gifs, screengrabs, or video clips; add some music; and your engaging social video will be ripe for Facebook and Twitter.
Standout Features: Blog-to-social-promo creation; drag-and-drop interface
Pricing: Create as many 480p videos as you want with the free version; or, for $50 per month, upgrade to 1080p HD.

3. Nero Video

Best Video Editing Software For Beginners Nero
One of the cheaper options around ($49.99), Nero Video holds its own on this list—it comes well-stocked with a lot of the tricks and effects you’ll find among other products vying for video editing supremacy, and as far as software for beginners, you can certainly do worse. If you’re going to spend money learning how to edit videos, however, you might want to steer clear. Nero just doesn’t have the speed and functionality of some of the other products listed here, and if it’s value proposition is its price, $50 is still not all that cheap.  
Standout Features: Low pricing
Pricing: One-time payment of $49.99

4. Corel VideoStudio

Best Video Editing Software For Beginners Corel
Corel VideoStudio has all the characteristics of the other top-of-the-line products on this list, including 360-degree VR and 4k support, but it also has the distinction of being the first piece of consumer video editing software to offer motion tracking—which, if you’re not already familiar, is a feature that allows you to track specific objects throughout your cut (if you wanted, say, to point an arrow at one of your characters, blur out his face, or bestow him with a funny hat). Most of the products on this list come equipped with motion tracking, but VideoStudio still boasts one of the best motion tracking systems around.
One of the knocks on VideoStudio is its speed, which lags notably behind some of the faster systems on this list, like CyberLink PowerDirector and Pinnacle Studio. Still: for a one-time payment of $51.99? You can do much worse.
Standout Features: Motion tracking
Pricing: One-time payment of $51.99

5. Filmora from Wondershare

Best Video Editing Software For Beginners Filmora
When it comes to free video editing software, Filmora is about as multi-faceted as they come. Filmora is Wondershare’s standard, simple, high-quality video editing offering; but Wondershare also offers FilmoraGo (for mobile editing) and Filmora Scrn (for screen recording and editing). The design is intuitive and easy to use, and comes replete with filters, overlays, motion elements, transitions, and a small selection of royalty-free music. Here are a few more of the “basics” Filmora offers: 
Best Video Editing Software For Beginners 4K
4k and gif support are boilerplate features for most video editing products today, but one thing Filmora does particularly well is titles. Title tools are trending in video software, and while Filmora’s doesn’t have the functionality of say, an Apple Final Cut Pro X, which can superimpose 3D titles over your videos and rotate them on three axes, it nonetheless has some snazzy titling features for the money you’re spending.
Another Filmora feature beginners to video editing will find attractive is “Easy Mode,” which allows you to create fun, polished edits by merely dragging and dropping clips, choosing a theme, and selecting music.
Standout features: Title tool; mobile and screen editing; “Easy Mode”
Pricing: Starts at $59.99 for a lifetime license; or, $39.99 for a year.

6. CyberLink PowerDirector

Best Video Editing Software For Beginners CyberLink
So—we stretched the meaning of “software” a bit earlier; now, we’re going to stretch the meaning of “beginner.” We included CyberLink PowerDirector on this list because its interface is, at the end of the day, pretty straightforward. Head to the product page, run through the tutorials, and you’ll be alright. There is within the interface, however, an embarrassment of options and effects. If you’re not willing to invest the time in learning all of them, it can get a bit overwhelming. 
Best Video Editing Software For Beginners CyberLink 2
Don’t be scared of CyberLink’s extra features; just be wary of your commitment level!
In terms of rendering, PowerDirector is regarded as one of the fastest video editing systems around. It also operates consistently in the sphere of the innovative and cutting edge. PowerDirector led the charge in the switch to 4k, and today, it’s one of the first systems to support 360-degree virtual reality footage.   
Price: you get what you pay for! $79.99 gets you unlimited access to one of the most capable pieces of video editing software around.
Standout Features: Lightning-fast rendering; comprehensive suite of effects
Pricing: One-time payment of $79.99

7. Adobe Premiere Elements

Best Video Editing Software For Beginners Adobe
We include Premiere Elements on the list mostly because it’s been an industry leader in the video editing game for some time. And $79.99 is not egregious, but we’re here to say that at that price, you’re mostly paying for the name. In the time since Premiere Elements’ inception, too many other products have surpassed it in speed and capability for us to place it among the cream of the crop. That’s to take nothing away from Premiere Elements’ usability, though—specifically for beginners.
The Guided Edits feature makes Adobe Premiere a particularly attractive option for beginners, as it allows them to take on both quick edits and advanced projects with substantial assistance from the software.  
Best Video Editing Software For Beginners Adobe 2
If you’re not entirely sure what you’re doing, don’t sleep on Guided Edits!
So while Premiere Elements lags behind the competition in terms of speed, 3D editing, multi-cam, and some other advanced features, it’s still a great choice for the beginner looking for a comprehensive suite of effects, and some guidance on how to implement them.
Standout Features: Guided Edits; simple interface
Pricing: One-time payment of $79.99

8. Pinnacle Studio

Best Video Editing Software For Beginners Pinnacle
At the higher end of the Corel product line is Pinnacle Studio—which, at $129.95 (the amount you’ll need to pay to edit 360-degree and 4k content with the “Ultimate” version), costs more than twice as much as VideoStudio. What do you get for the extra money? Well, not only does Pinnacle come readily equipped with all the features you’d expect from an upper-echelon product—motion tracking, 360-degree VR support, 4k support, multi-cam, etc.—but you’d be hard-pressed to find a faster product on the market in terms of rendering.
For all of its features, Pinnacle’s interface is still as user-friendly and intuitive as anything on this list. Thus, is you have the need for speed, and you don’t mind shelling out a few extra bucks for it, Pinnacle might be the product for you.
Standout Features: Top-of-the-line rendering speeds; full range of features and support
Pricing: One-time payment of $129.95

9. Adobe Premiere Pro

Best Video Editing Software For Beginners Adobe
With a virtually unmatched suite of features, 360 VR and 4k support, and a newly implemented ability to store, organize, and share assets online with a team, Adobe Premiere Pro is perhaps the most complete piece of video editing software around. Here’s a recent video promo for our free AdWords account structure guide we cut using Premiere Pro.
One of the more dazzling of Premiere Pro’s tools is the Lumetri Color tool, which offers color adjustment and manipulation on par with that of a Photoshop. The multi-cam feature is also a winner—whereas most systems allow you to work with a limited number of camera angles, Premiere Pro’s latest iteration allows for an unlimited amount.  
Throw in a wealth of titling options, readily connected ancillary apps (like Photoshop and After Effects), and a flexible, easy-to-use interface, and Premiere Pro is a no brainer.
Standout Features: Multi-cam and coloring options; title tool; easy integration with Adobe Products; straightforward interface
Pricing: $19.99/month

10. Apple Final Cut Pro X

Best Video Editing Software For Beginners Final Cut
For the most advanced, least fiscally prudent of beginners, there’s Apple Final Cut Pro X. $299.99 might be a little steep for a product you may well have a difficult time understanding; but for those among you who enjoy a challenge, and who aspire to some level of professionalism in video editing, why not go for it? Apple has made the transition from iMovie to Final Cut Pro more painless than ever—so if you’re the kind of guy or gal who enjoys him/herself an Apple product, and has worked with iMovie to the point of mastery, it might be time to splurge on Final Cut Pro. The power is still daunting; the interface, significantly less so.   
Standout Features: Magnetic Timeline; Touch Bar support
Pricing: One-time payment of $299.99

Some Final Thoughts

Are you a content or social media marketer looking to get in the video editing game for the sake of keeping up with the growing video trend? Don’t stress! Any of the above products would make a fine choice for a beginner.
Think about your budget, your current level of expertise, and how much time you’re willing to devote to learning a new skill. Whether you're looking for the best video editing software for YouTube, or the responsibility has simply fallen on you to get your team’s video marketing strategy up to snuff—don’t wait around deliberating! Get invested in one of these video editing products, and make it yours.

Featured post

SBI Customer Care, 24x7 Toll Free Number

SBI Customer Care, 24x7 Toll Free Number SBI Customer Care, 24x7 Toll Free Number State Bank of India (SBI) is the largest bank of the co...

Featured