Thursday, 26 April 2018

Windows 7, 8, and 10 - Show Hidden Files and Folders


Windows stores many important settings in hidden files and folders. Do not modify or delete hidden files if you do not know precisely what will happen as a result. DoIT assumes no liability for data loss that occurs as a result of this procedure.
Procedure

1.Access the Control Panel.
2.Type "folder" into the search bar and select Show hidden files and folders.

3.Then, click on the View tab at the top of the window.
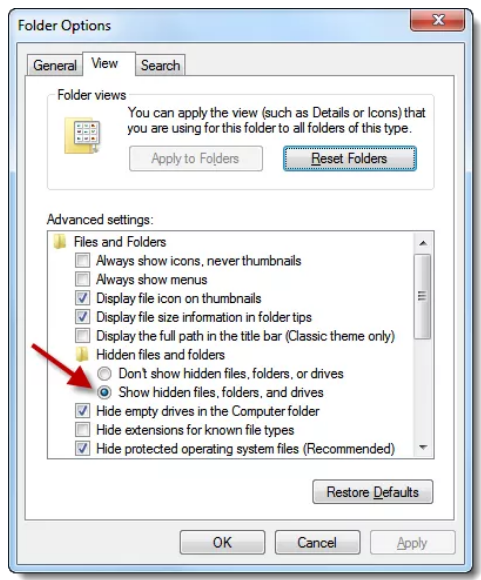
4.Under Advanced Settings, locate "Hidden files and folders." Select Show hidden files and folders just below that.

5.Click on OK.
6.Hidden files will now be shown when performing searches in Windows Explorer.
Note: Hidden files will be greyed out. This is merely to indicate that they are a hidden file. You can still use them as though they were a normal file.

Windows 7, 8, and 10 - Show Hidden Files and Folders


Windows stores many important settings in hidden files and folders. Do not modify or delete hidden files if you do not know precisely what will happen as a result. DoIT assumes no liability for data loss that occurs as a result of this procedure.
Procedure

1.Access the Control Panel.
2.Type "folder" into the search bar and select Show hidden files and folders.

3.Then, click on the View tab at the top of the window.
4.Under Advanced Settings, locate "Hidden files and folders." Select Show hidden files and folders just below that.

5.Click on OK.
6.Hidden files will now be shown when performing searches in Windows Explorer.
Note: Hidden files will be greyed out. This is merely to indicate that they are a hidden file. You can still use them as though they were a normal file.

Wednesday, 25 April 2018

Best Windows 7 tips and tricks


Windows 7 is a good operating system right out of the box, but tweaking some of the settings and using keyboard shortcuts can enhance the Windows experience.

Here are Best useful Windows tips and tricks to help you get more out of Windows 7:
1. Bypass the Recycle Bin
The Windows Recycle Bin is a good safeguard against accidental file deletions. However, when you know you want to permanently delete a file, you can bypass it. Instead of pressing the Del key, press Shift+Del, then Shift+Enter to confirm.

If you prefer, you can also permanently disable the Recycle Bin. First, right-click on the Recycle Bin, then choose Properties. Click on the drive you want to disable the Recycle Bin for, then select "Don't move files to the Recycle Bin. Remove files immediately when deleted." Click the OK or Apply button to save the changes.

2. Lock Windows quickly

Whether you're at the office, library, or cafe, it's always a good idea to lock Windows before you step away. To lock Windows quickly, press Windows Logo+L.


3. Show hidden files, folders, and drives
To view files, folders, and drives that Windows hides, open the Windows search box (Windows Logo) and type folder. Next, select Folder Options from the search list and navigate to the View tab. Under Hidden files and folders, check the box next to "Show hidden files, folders, and drives."

4.Rename multiples files
To rename multiple files in Windows, highlight the files you want to rename, then hit the F2 key. Rename the first file, then hit Enter. All your files will be renamed and a number in parenthesis will be added to the end of the name. If you change your mind, you can hit Ctrl+Z to undo the rename.

Windows 7 Keyboard Tricks 

5.[Windows] + [D] (Aero Peek)
Show or hide the desktop.
[Windows] + [Home] (Aero Shake)
Minimize all but selected window. Reverse by clicking the key combination again.
[Windows] + left arrow OR [Windows] + right arrow (Aero Snap)
Dock selected window to the left or right half of your screen.
[Windows] + up arrow OR [Windows] + down arrow (Aero Snap)
Maximized and restores the selected window.
[Windows] + [SHIFT] + up arrow OR [Windows] + [SHIFT] + down arrow (Aero Snap)
Maximizes and restores selected window in vertical dimension only.
[Windows] + [Tab] (Aero Flip)
Launch 3D representation of open windows and click [Tab] key again to flip through them.

6.Windows & Taskbar
1.[Alt] + [Ctrl] + [Tag] + left/right/up/down arrow
     Flip window.
2. [Alt] + [Tab]
     Cycle through open windows.


[Windows] + [T] OR [Windows] + [SHIFT] + [T]
Move focus to front or back of taskbar. Press [T] again while holding the [Windows] key to cycle through items in the taskbar from left to right or, with [SHIFT] button held too, from right to left.
[Windows] + [B]
Puts focus on the ‘show hidden icons’ button on the system tray.
[Windows] + [1] THROUGH [Windows] + [9]
Launch first through ninth icon on taskbar, including items pinned to taskbar.
[Windows] + [SHIFT] + [1] THROUGH [Windows] + [SHIFT] + [9]
Starts new instance of respective taskbar icon.
[Windows] + [Ctrl] + [1] THROUGH [Windows] + [Ctrl] + [9]
Cycles through multiple instances of the respective icon.
[Windows] + [Alt] + [1] THROUGH [Windows] + [Alt] + [9]
Opens jump list for respective icon.


8.Multiple Monitors
[Windows] + [SHIFT] + right arrow OR [Windows] + [SHIFT] + left arrow
Move selected window from one monitor to another. They will remain in the same relative location.
[Windows] + [P]
Select presentation display mode.

9.Magnifier

[Windows] + [+] OR [Windows] + [-]
Activates Windows Magnifier to zoom in or out of screen.
[Ctrl] + [Alt] + [D]
Switch to docked mode.
[Ctrl] + [Alt] + [L]
Switch to lense mode.

  • [Ctrl] + [Alt] + [F]
    Switch from docked or lens mode back to full screen mode.
  • [Ctrl] + [Alt] + [I]
    Invert colors.
  • [Windows] + [Esc]
    Exist magnifier views.

Best Windows 7 tips and tricks


Windows 7 is a good operating system right out of the box, but tweaking some of the settings and using keyboard shortcuts can enhance the Windows experience.

Here are Best useful Windows tips and tricks to help you get more out of Windows 7:
1. Bypass the Recycle Bin
The Windows Recycle Bin is a good safeguard against accidental file deletions. However, when you know you want to permanently delete a file, you can bypass it. Instead of pressing the Del key, press Shift+Del, then Shift+Enter to confirm.

If you prefer, you can also permanently disable the Recycle Bin. First, right-click on the Recycle Bin, then choose Properties. Click on the drive you want to disable the Recycle Bin for, then select "Don't move files to the Recycle Bin. Remove files immediately when deleted." Click the OK or Apply button to save the changes.

2. Lock Windows quickly

Whether you're at the office, library, or cafe, it's always a good idea to lock Windows before you step away. To lock Windows quickly, press Windows Logo+L.


3. Show hidden files, folders, and drives
To view files, folders, and drives that Windows hides, open the Windows search box (Windows Logo) and type folder. Next, select Folder Options from the search list and navigate to the View tab. Under Hidden files and folders, check the box next to "Show hidden files, folders, and drives."

4.Rename multiples files
To rename multiple files in Windows, highlight the files you want to rename, then hit the F2 key. Rename the first file, then hit Enter. All your files will be renamed and a number in parenthesis will be added to the end of the name. If you change your mind, you can hit Ctrl+Z to undo the rename.

Windows 7 Keyboard Tricks 

5.[Windows] + [D] (Aero Peek)
Show or hide the desktop.
[Windows] + [Home] (Aero Shake)
Minimize all but selected window. Reverse by clicking the key combination again.
[Windows] + left arrow OR [Windows] + right arrow (Aero Snap)
Dock selected window to the left or right half of your screen.
[Windows] + up arrow OR [Windows] + down arrow (Aero Snap)
Maximized and restores the selected window.
[Windows] + [SHIFT] + up arrow OR [Windows] + [SHIFT] + down arrow (Aero Snap)
Maximizes and restores selected window in vertical dimension only.
[Windows] + [Tab] (Aero Flip)
Launch 3D representation of open windows and click [Tab] key again to flip through them.

6.Windows & Taskbar
1.[Alt] + [Ctrl] + [Tag] + left/right/up/down arrow
     Flip window.
2. [Alt] + [Tab]
     Cycle through open windows.


[Windows] + [T] OR [Windows] + [SHIFT] + [T]
Move focus to front or back of taskbar. Press [T] again while holding the [Windows] key to cycle through items in the taskbar from left to right or, with [SHIFT] button held too, from right to left.
[Windows] + [B]
Puts focus on the ‘show hidden icons’ button on the system tray.
[Windows] + [1] THROUGH [Windows] + [9]
Launch first through ninth icon on taskbar, including items pinned to taskbar.
[Windows] + [SHIFT] + [1] THROUGH [Windows] + [SHIFT] + [9]
Starts new instance of respective taskbar icon.
[Windows] + [Ctrl] + [1] THROUGH [Windows] + [Ctrl] + [9]
Cycles through multiple instances of the respective icon.
[Windows] + [Alt] + [1] THROUGH [Windows] + [Alt] + [9]
Opens jump list for respective icon.


8.Multiple Monitors
[Windows] + [SHIFT] + right arrow OR [Windows] + [SHIFT] + left arrow
Move selected window from one monitor to another. They will remain in the same relative location.
[Windows] + [P]
Select presentation display mode.

9.Magnifier

[Windows] + [+] OR [Windows] + [-]
Activates Windows Magnifier to zoom in or out of screen.
[Ctrl] + [Alt] + [D]
Switch to docked mode.
[Ctrl] + [Alt] + [L]
Switch to lense mode.

  • [Ctrl] + [Alt] + [F]
    Switch from docked or lens mode back to full screen mode.
  • [Ctrl] + [Alt] + [I]
    Invert colors.
  • [Windows] + [Esc]
    Exist magnifier views.

HOW CREATE USER AND PASSWORD IN WINDOW 7


While installing Windows 7, one of the steps is to a username and then you are given an option to either type a password for this username. You might not wish to type a password at that time, but now after that you installed Windows 7 and set it up, you are ready to create a password for your user account.

To create a password for a user account, follow the below steps:

Click on Start     > Control Panel

2.Under the User Accounts and Family Safety category, click on Add or remove user accounts

3.Choose the account that you would like to create a password for, this is done by clicking on the user account name.

4.The Change an Account page will open, click on Create a password


5.Type the password you want to set for this user account.


Remember to set a strong password, else it would be useless to have a password that anyone would guess

A strong password is considered to be :

  • Is at least eight characters long. These characters contain letters, digits and special characters such as ( $ , % , etc .. )
  • Does not contain your user name, real name, or company name.
  • Does not contain a complete word.
  • Is significantly different from previous passwords.
Actually its really up to you, you can have a password of a single character and you might be satisfied with it.
After you type your password and confirm it again, click on Create password button. If you are a person who usually forgets his passwords, then its better to type a password hint, so that when you forget your password, from reading the hint, it will give you an idea what your password is, but remember, password hint is visible to everyone who uses the computer, so make sure that your hint is not understood by someone else, choose your own hints.

HOW CREATE USER AND PASSWORD IN WINDOW 7


While installing Windows 7, one of the steps is to a username and then you are given an option to either type a password for this username. You might not wish to type a password at that time, but now after that you installed Windows 7 and set it up, you are ready to create a password for your user account.

To create a password for a user account, follow the below steps:

Click on Start     > Control Panel

2.Under the User Accounts and Family Safety category, click on Add or remove user accounts

3.Choose the account that you would like to create a password for, this is done by clicking on the user account name.

4.The Change an Account page will open, click on Create a password


5.Type the password you want to set for this user account.


Remember to set a strong password, else it would be useless to have a password that anyone would guess

A strong password is considered to be :

  • Is at least eight characters long. These characters contain letters, digits and special characters such as ( $ , % , etc .. )
  • Does not contain your user name, real name, or company name.
  • Does not contain a complete word.
  • Is significantly different from previous passwords.
Actually its really up to you, you can have a password of a single character and you might be satisfied with it.
After you type your password and confirm it again, click on Create password button. If you are a person who usually forgets his passwords, then its better to type a password hint, so that when you forget your password, from reading the hint, it will give you an idea what your password is, but remember, password hint is visible to everyone who uses the computer, so make sure that your hint is not understood by someone else, choose your own hints.

Tuesday, 24 April 2018

Ping Command


The ping command is a Command Prompt command used to test the ability of the source computer to reach a specified destination computer. The ping command is usually used as a simple way to verify that a computer can communicate over the network with another computer or network device.


The ping command operates by sending Internet Control Message Protocol (ICMP) Echo Request messages to the destination computer and waiting for a response.


How many of those responses are returned, and how long it takes for them to return, are the two major pieces of information that the ping command provides.

For example, you might find that there are no responses when pinging a network printer, only to find out that the printer is offline and its cable needs replaced. Or maybe you need to ping a router to verify that your computer can connect to it, to eliminate it as a possible cause for a networking issue.

Ping Command Availability
The ping command is available from within the Command Prompt in Windows 10, Windows 8, Windows 7, Windows Vista, and Windows XP operating systems. The ping command is also available in older versions of Windows like Windows 98 and 95.

The ping command can also be found in Command Prompt in the Advanced Startup Options and System Recovery Options repair/recovery menus.

Note: The availability of certain ping command switches and other ping command syntax might differ from operating system to operating system.


Ping Command Syntax
ping [-t] [-a] [-n count] [-l size] [-f] [-i TTL] [-v TOS] [-r count] [-s count] [-w timeout] [-R] [-S srcaddr] [-p] [-4] [-6] target [/?]

Tip: See How to Read Command Syntax if you're not sure how to interpret the ping command syntax as its described above or in the table below.

-t             Using this option will ping the target until you force it to stop by using Ctrl-C.
-a            This ping command option will resolve, if possible, the hostname of an IP address target.
-n count               This option sets the number of ICMP Echo Requests to send, from 1 to 4294967295. The ping command will send 4 by default if -n isn't used.
-l size     Use this option to set the size, in bytes, of the echo request packet from 32 to 65,527. The ping command will send a 32-byte echo request if you don't use the -l option.
-f             Use this ping command option to prevent ICMP Echo Requests from being fragmented by routers between you and the target. The -f option is most often used to troubleshoot Path Maximum Transmission Unit (PMTU) issues.
-i TTL      This option sets the Time to Live (TTL) value, the maximum of which is 255.
-v TOS   This option allows you to set a Type of Service (TOS) value. Beginning in Windows 7, this option no longer functions but still exists for compatibility reasons.
-r count                Use this ping command option to specify the number of hops between your computer and the target computer or device that you'd like to be recorded and displayed. The maximum value for count is 9, so use the tracert command instead if you're interested in viewing all the hops between two devices.
-s count                Use this option to report the time, in Internet Timestamp format, that each echo request is received and echo reply is sent. The maximum value for count is 4, meaning that only the first four hops can be time stamped.
-w timeout         Specifying a timeout value when executing the ping command adjusts the amount of time, in milliseconds, that ping waits for each reply. If you don't use the -w option, the default timeout value of 4000 is used, which is 4 seconds.

-R            This option tells the ping command to trace the round trip path.
-S srcaddr            Use this option to specify the source address.
-p            Use this switch to ping a Hyper-V Network Virtualization provider address.
-4            This forces the ping command to use IPv4 only but is only necessary if target is a hostname and not an IP address.
-6            This forces the ping command to use IPv6 only but as with the -4 option, is only necessary when pinging a hostname.
target    This is the destination you wish to ping, either an IP address or a hostname.
/?            Use the help switch with the ping command to show detailed help about the command's several options.

Note: The -f, -v, -r, -s, -j, and -k options work when pinging IPv4 addresses only. The -R and -S options only work with IPv6.

Other less commonly used switches for the ping command exist including [-j host-list], [-k host-list], and [-c compartment]. Execute ping /? from the Command Prompt for more information on these options.

Tip: ​You can save the ping command output to a file using a redirection operator. See How to Redirect Command Output to a File for instructions or see our Command Prompt Tricks list for more tips.

Ping Command Examples
ping -n 5 -l 1500 www.google.com
In this example, the ping command is used to ping the hostname www.google.com. The -n option tells the ping command to send 5 ICMP Echo Requests instead of the default of 4, and the -l option sets the packet size for each request to 1500 bytes instead of the default of 32 bytes.

The result displayed in the Command Prompt window will look something like this:

Pinging www.google.com [74.125.224.82] with 1500 bytes of data:
Reply from 74.125.224.82: bytes=1500 time=68ms TTL=52
Reply from 74.125.224.82: bytes=1500 time=65ms TTL=52
Reply from 74.125.224.82: bytes=1500 time=66ms TTL=52
Reply from 74.125.224.82: bytes=1500 time=70ms TTL=52
Ping statistics for 74.125.224.82:
   Packets: Sent = 5, Received = 5, Lost = 0 (0% loss),
Approximate round trip times in milli-seconds:
   Minimum = 65ms, Maximum = 70ms, Average = 67ms

The 0% loss reported under Ping statistics for 74.125.224.82 tells me that each ICMP Echo Request message sent to www.google.com was returned. This means that, as far as my network connection goes, I can communicate with Google's website just fine.


ping 127.0.0.1
In the above example, I'm pinging 127.0.0.1, also called the IPv4 localhost IP address or IPv4 loopback IP address, without options.

Using the ping command to ping 127.0.0.1 is an excellent way to test that Windows' network features are working properly but it says nothing about your own network hardware or your connection to any other computer or device.

The IPv6 version of this test would be ping ::1.

ping -a 192.168.1.22
In this example, I'm asking the ping command to find the hostname assigned to the 192.168.1.22 IP address, but to otherwise ping it as normal.

Pinging J3RTY22 [192.168.1.22] with 32 bytes of data:
Reply from 192.168.1.22: bytes=32 time
As you can see, the ping command resolved the IP address I entered, 192.168.1.22, as the hostname J3RTY22, and then executed the remainder of the ping with default settings.

ping -t -6 SERVER
In this example, I force the ping command to use IPv6 with the -6 option and continue to ping SERVER indefinitely with the -t option.

Pinging SERVER [fe80::fd1a:3327:2937:7df3%10] with 32 bytes of data:
Reply from fe80::fd1a:3327:2937:7df3%10: time=1ms
Reply from fe80::fd1a:3327:2937:7df3%10: time
I interrupted the ping manually with Ctrl-C after seven replies. Also, as you can see, the -6 option produced IPv6 addresses.

Tip: The number after the % in the replies generated in this ping command example is the IPv6 Zone ID, which most often indicates the network interface used. You can generate a table of Zone IDs matched with your network interface names by executing netsh interface ipv6 show interface. The IPv6 Zone ID is the number in the Idx column.

Ping Related Commands

The ping command is often used with other networking related Command Prompt commands like tracert, ipconfig, netstat, nslookup, and others.


Featured post

SBI Customer Care, 24x7 Toll Free Number

SBI Customer Care, 24x7 Toll Free Number SBI Customer Care, 24x7 Toll Free Number State Bank of India (SBI) is the largest bank of the co...

Featured